Home » Categories » Virtualization » VMware

Shrinking VMDK Virtual Disk Size on VMWare ESXi

Reduce the VMDK File Size of the VMWare Virtual Machine

  1. Shut down the virtual machine you want to reduce disk size;
  2. Using SSH, connect to the console of the ESXi host the VM is registered on (you can use putty or the built-in Windows SSH client);
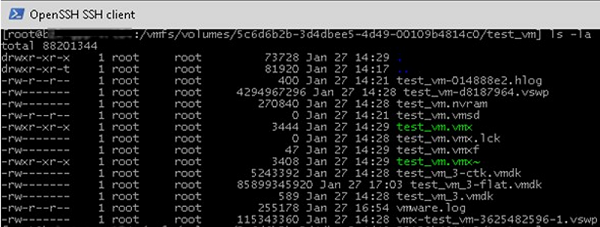
  3. Go the directory the VMDK file of your VM is located in (you can get a path to it in the virtual disk properties of the vSphere client):
    $ cd /vmfs/volumes/datastore/test-VM


  4. Display the contents of the virtual disk configuration file (*.vmdk) using the cat command:
    $ cat test_vm_3.vmdk
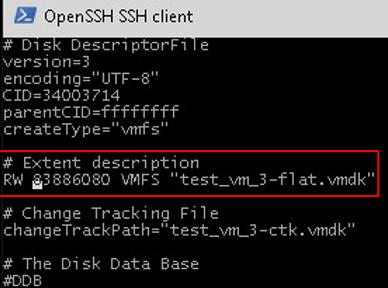
    The size of the vmdk disk is shown in the #Extent description section (after the RW characters). In this case, it is 167772160 (80 GB *1024*1024*1024 / 512);

    vmware vmdk file size

  5. I want to reduce my VMDK disk from 80 to 40 GB. It means that I have to specify 83886080 (40 GB*1024*1024*1024 / 512) in the Extent description section. Set a new size of your virtual disk using a text editor (vi or nano);
  6. I am using vi: 
    $ vi test_vm_3.vmdk

  7. Using the down arrow key, go to the line containing the disk size and press i (to edit it). Specify the new size of the virtual disk.
    Press ESC to exit the edit mode and then type :wq -> Enter to save the; changes;

    shrink vmdk file size on vmware datastore

  8. Then just clone or migrate (using Storage vMotion) the virtual machine to another datastore. After moving the virtual machine files, the new size of its virtual disk will be displayed in its properties.
    Tip. If you have only one ESXi host, one VMFS datastore, you won’t be able to use the Storage vMotion.
    Then you can clone vmdk using this command:
    $ vmkfstools -i test_vm_3.vmdk test_vm_3_newsize.vmdk

    vmkfstools - clone file with reducing file size

    Remove the source VMDK disk, clone the reaming VMDK disk again and rename it by specifying its original name:
    $ rm test_vm_3.vmdk
    $ rm test_vm_3-flat.vmdk
    $ vmkfstools -i test_vm_3_newsize.vmdk test_vm_3.vmdk

  9. Make sure that the new size of the virtual disk is now displayed in the VM properties.

Ref:
http://woshub.com/shrinking-vmdk-virtual-disk-vmware-esxi/

Article Rating (No Votes)
Rate this article
  • Icon PDFExport to PDF
  • Icon MS-WordExport to MS Word
 
Attachments Attachments
There are no attachments for this article.
Comments Comments
There are no comments for this article. Be the first to post a comment.
Related Articles RSS Feed
How to Export a vSphere ESXi 6.7 Virtual Machine
Viewed 997 times since Sun, Feb 7, 2021
OVFTool - Error: SHA digest of file ExortedVM.ovf does not match manifest
Viewed 1774 times since Mon, Jan 3, 2022
Convert qcow2 to vmdk
Viewed 819 times since Tue, Feb 9, 2021
Convert Thick Provision Lazy Zeroed Disk to Thin on VMware ESXi by vmkfstools
Viewed 572 times since Sat, Jan 1, 2022
Migrate qcow2 images from KVM to VMWare
Viewed 2925 times since Sat, Feb 20, 2021
VMware - Using the OVF Tool deploy
Viewed 475 times since Sun, Jan 2, 2022
VMware - Using the OVF Tool to export
Viewed 449 times since Sun, Jan 2, 2022