;)

;)
;)
;)
;)
;)
;)
;)
;)


;)
;)
;)
;)
;)
;)
;)
;)

;)
;)
;)
;)
;)
;)
;)
;)
| Home » Categories » Linux | ||||
How to Configure Swap Space in Ubuntu 24.04? |
||||
|
Article Number: 135 | Rating: Unrated | Last Updated: Thu, Sep 25, 2025 at 12:34 PM
|
||||
PrerequisitesBefore starting, ensure you have:
Step 1: Check Current Memory and Swap StatusFirst, examine your system's current memory configuration to understand what resources are already available. 1.1 View the current memory usage, including any existing swap: sudo free -h
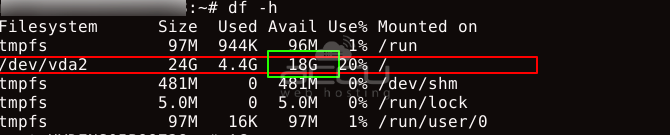
The swap total is 0B, which means no swap is enabled. This command displays memory information in a human-readable format. You'll see output similar to above: 1.2 Check specifically for active swap spaces: sudo swapon --show If no output appears, your system does not have any active swap files or partitions. If you see output, it displays currently active swap spaces, along with their sizes and priorities. 1.3 Verify available disk space to ensure you have enough room for the swap file: df -h
Look for the root filesystem (/) and ensure you have adequate free space. A good rule of thumb is to have at least 1-2GB of free space beyond your intended swap size. Step 2: Create the Swap FileNow, create a dedicated swap file. The size depends on your system's needs, but here are standard guidelines:
2.1 Create a 2GB swap file using the fallocate command: sudo fallocate -l 2G /swapfile# No Direct Output The fallocate command immediately allocates the specified space. If fallocate doesn't work, use the alternative dd method: sudo dd if=/dev/zero of=/swapfile bs=1M count=2048 This creates the same 2GB file but may take longer as it writes zeros to the entire file. 2.2 Verify the file was created with the correct size: ls -lh /swapfile
You should see output showing the file size as 2.0 G. Step 3: Set Proper File PermissionsSwap files contain sensitive data from your system's memory, so securing them is crucial. 3.1 Set restrictive permissions so only the root user can read and write the file: Sudo chmod with code 600 is used to keep any file private sudo chmod 600 /swapfile# No Direct Output 3.2 Verify the permissions are correctly set: ls -lh /swapfile
The output should show -rw-------, indicating only root has read/write access. Step 4: Format and Enable the Swap FileTransform your regular file into a swap space that the system can use. 4.1 Format the file as swap space: sudo mkswap /swapfile
This command prepares the file for use as swap and displays information about the created swap space, including its UUID. 4.2 Enable the swap file for immediate use: sudo swapon /swapfile# No Direct Output 4.3 Verify the swap is now active: sudo swapon --show
You should see your new swap file listed with its size and priority. 4.4 Check the updated memory information: sudo free -h
The swap line should now show the additional space available. Step 5: Set up Permanent SwapCurrently, your swap file is only active for this session. To ensure it remains active after reboots, add it to the system's file system table. 5.1 First, create a backup of the fstab file: sudo cp /etc/fstab /etc/fstab.backup# No Direct Output 5.2 Add the swap file to the fstab configuration: echo '/swapfile none swap sw 0 0' | sudo tee -a /etc/fstab# No Direct Output This line instructs the system to mount the swap file at boot time automatically. The fields mean:
Step 6: How to Optimize Swap?Fine-tune your swap configuration for optimal performance based on your system's usage patterns. Adjust SwappinessSwappiness controls how aggressively the system uses swap space. The value ranges from 0 to 100:
Check the current swappiness value: 6.1 cat /proc/sys/vm/swappiness For servers or systems where you want to minimize swap usage, set a lower value: sudo sysctl vm.swappiness=10 6.2 Make this change permanent by adding it to the sysctl configuration: echo 'vm.swappiness=10' | sudo tee -a /etc/sysctl.conf 6.3 Adjust Cache Pressure The cache pressure setting controls how quickly the system removes cached file system data. Lower values keep the cache longer, improving file system performance. Check the current cache pressure: cat /proc/sys/vm/vfs_cache_pressure Set a more conservative value: sudo sysctl vm.vfs_cache_pressure=50 Make this permanent: echo 'vm.vfs_cache_pressure=50' | sudo tee -a /etc/sysctl.conf Step 7: Test Your Swap ConfigurationVerify everything is working correctly and will persist across reboots. Test automatic mounting without rebooting: sudo swapoff /swapfile sudo swapon -a The first command disables your swap file, and the second command enables all swap spaces listed in the fstab file. Check that your swap is active again: sudo swapon --show Monitor swap usage in real-time: watch -n 1 'free -h' Press Ctrl+C to exit the watch command. Managing Swap SpaceDisabling Swap (If Needed)If you need to remove swap space later: # Disable the swap file sudo swapoff /swapfile # Remove the file sudo rm /swapfile Remove the swap entry from fstab by editing the file: sudo nano /etc/fstab Delete the line containing /swapfile none swap sw 0 0. Troubleshooting Common IssuesIssue: The fallocate command fails. Solution: Use the dd method instead, or check if your filesystem supports fallocate. Issue: Swap file doesn't activate after reboot. Solution: Verify the fstab entry is correct and the file permissions are set to 600. Issue: The System becomes slow after enabling swap. Solution: Reduce the swappiness value to minimize swap usage, or consider adding more RAM. Issue: "Operation not permitted" when creating a swap file. Solution: Ensure you're using sudo and have sufficient disk space. Best Practices
Setting up swap space in Ubuntu 24.04 provides your system with extra memory when it becomes tight. Although Ubuntu now includes zram compression by default, traditional swap files still address real problems, especially for hibernation, low-memory systems, and resource-intensive applications. Your new swap configuration will start automatically every time you boot up, helping prevent those frustrating moments when programs crash due to memory shortages. |
||||
|
| ||||
Attachments

There are no attachments for this article.
| ||||
Comments  There are no comments for this article. Be the first to post a comment.  Add Comment Add Comment | ||||
Related Articles  There are no related articles for this article. |
| KB Home | Advanced Search | News | Glossary | Login |
|
| Navel Knowledge Base |
|
|
|