;)

;)
;)
;)
;)
;)
;)
;)
;)
;)
;)
;)
;)
;)
;)
;)
;)

;)
;)
;)
;)
;)
;)
;)
;)


| Home » Categories » WordPress | ||||
How to Add an Admin User to the WordPress Database via MySQL |
||||
|
Article Number: 118 | Rating: Unrated | Last Updated: Thu, Dec 8, 2022 at 2:26 PM
|
||||
Adding an Admin User to the WordPress Database With phpMyAdminPhpMyAdmin comes pre-installed with most top WordPress hosting companies. You can find it under the Databases section of your hosting account’s cPanel dashboard. Here is a screenshot from the Bluehost control panel:
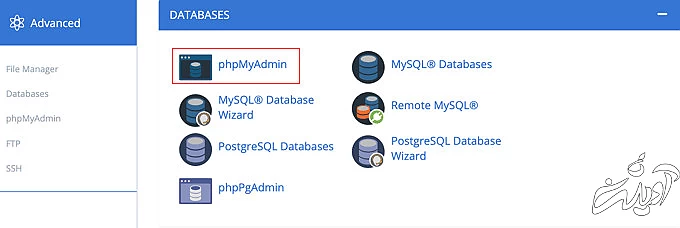 Opening phpMyAdmin from CPanel Opening phpMyAdmin from CPanel
Clicking on the icon will open the phpMyAdmin interface. You need to select your WordPress database from the left column. After, that phpMyAdmin will display all tables in your WordPress database. You will be making changes to the
 You Will Be Making Changes to the wp_users and wp_usermeta Tables You Will Be Making Changes to the wp_users and wp_usermeta Tables
Adding a User to the wp_users Table First, you need to find the Notice in the screenshot below that there are two user IDs in our demo website’s table, 1 and 2. When we create a new user for our demo site, we’ll give it the ID 3. You need to click the ‘Insert’ tab at the top of the screen so you can insert the information for a new admin user.
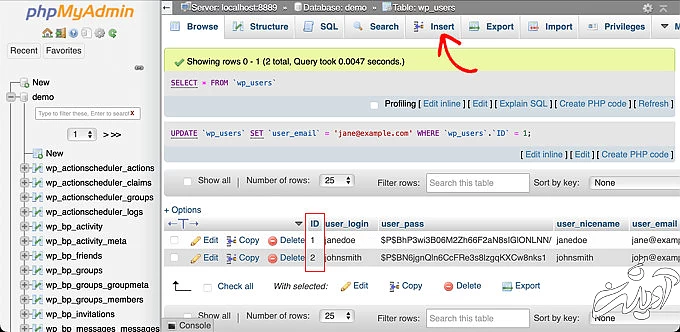 Click the Insert Tab Click the Insert Tab
Add the following information to the fields on the Insert form:
 Fill In the Fields for the New User Fill In the Fields for the New User
Once you have finished, make sure you click on the ‘Go’ button to store the new user. Adding a User to the wp_usermeta Table Now you need to find the Next, you need to add the following information to the Insert form:
 Fill In the Fields for the New User Fill In the Fields for the New User
After that, when you scroll down you should find fields for a second row. You need to add the following information:
 Fill In the Fields for the New User Fill In the Fields for the New User
When you have finished entering the information into the fields, you need to click the ‘Go’ button. Congratulations, you have created a new admin username. Now you should be able to log in to your WordPress admin area using the username and password you specified for this user. As soon as you log in, you need to navigate to Users » All Users, then click on the username you just created.
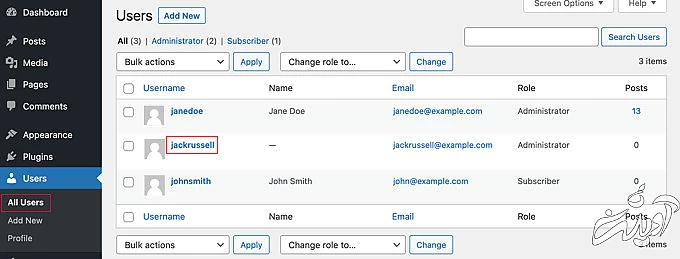 Navigate to Users » All Users and Edit the New User Navigate to Users » All Users and Edit the New User
Now, without changing anything, scroll to the bottom of the page and click the ‘Save’ button. This will allow WordPress to clean up the user you just created and add some needed information |
||||
|
| ||||
Attachments

There are no attachments for this article.
| ||||
Comments  There are no comments for this article. Be the first to post a comment.  Add Comment Add Comment | ||||
Related Articles 
Link to registration page in Wordpress
Viewed 289 times since Thu, Jun 12, 2025
حذف قیمت از محصولات ناموجود در ووکامرس
Viewed 1793 times since Sun, Nov 12, 2023
اجرای درخواست stats.wp.com/w.js
Viewed 1038 times since Sat, Feb 12, 2022
Sorry, you are not allowed to access this page.
Viewed 892 times since Wed, Dec 1, 2021
Wordpress random 500 internal server error
Viewed 528 times since Tue, Mar 1, 2022
How to export a specific page in Elementor?
Viewed 606 times since Sat, Feb 26, 2022
How to Disallow File Edits In WordPress - disallow_file_edit
Viewed 267 times since Sun, Jun 1, 2025
How to disable auth verification e-mail send from Wordfence
Viewed 1937 times since Tue, Jan 18, 2022
|
| KB Home | Advanced Search | News | Glossary | Login |
|
| Navel Knowledge Base |
|
|
|